|
|
||
|---|---|---|
| .vscode | ||
| assets | ||
| cli | ||
| tradingagents | ||
| web | ||
| .gitignore | ||
| LICENSE | ||
| README.md | ||
| docker-compose.yml | ||
| main.py | ||
| requirements.txt | ||
| setup.py | ||
README.md


TradingAgents: Multi-Agents LLM Financial Trading Framework
🎉 TradingAgents officially released! We have received numerous inquiries about the work, and we would like to express our thanks for the enthusiasm in our community.
So we decided to fully open-source the framework. Looking forward to building impactful projects with you!
🚀 TradingAgents | ⚡ Installation & CLI | 🎬 Demo | 📦 Package Usage | 🤝 Contributing | 📄 Citation
TradingAgents Framework
TradingAgents is a multi-agent trading framework that mirrors the dynamics of real-world trading firms. By deploying specialized LLM-powered agents: from fundamental analysts, sentiment experts, and technical analysts, to trader, risk management team, the platform collaboratively evaluates market conditions and informs trading decisions. Moreover, these agents engage in dynamic discussions to pinpoint the optimal strategy.

TradingAgents framework is designed for research purposes. Trading performance may vary based on many factors, including the chosen backbone language models, model temperature, trading periods, the quality of data, and other non-deterministic factors. It is not intended as financial, investment, or trading advice.
Our framework decomposes complex trading tasks into specialized roles. This ensures the system achieves a robust, scalable approach to market analysis and decision-making.
Analyst Team
- Fundamentals Analyst: Evaluates company financials and performance metrics, identifying intrinsic values and potential red flags.
- Sentiment Analyst: Analyzes social media and public sentiment using sentiment scoring algorithms to gauge short-term market mood.
- News Analyst: Monitors global news and macroeconomic indicators, interpreting the impact of events on market conditions.
- Technical Analyst: Utilizes technical indicators (like MACD and RSI) to detect trading patterns and forecast price movements.

Researcher Team
- Comprises both bullish and bearish researchers who critically assess the insights provided by the Analyst Team. Through structured debates, they balance potential gains against inherent risks.

Trader Agent
- Composes reports from the analysts and researchers to make informed trading decisions. It determines the timing and magnitude of trades based on comprehensive market insights.

Risk Management and Portfolio Manager
- Continuously evaluates portfolio risk by assessing market volatility, liquidity, and other risk factors. The risk management team evaluates and adjusts trading strategies, providing assessment reports to the Portfolio Manager for final decision.
- The Portfolio Manager approves/rejects the transaction proposal. If approved, the order will be sent to the simulated exchange and executed.

Installation and CLI
Installation
Clone TradingAgents:
git clone https://github.com/TauricResearch/TradingAgents.git
cd TradingAgents
Create a virtual environment in any of your favorite environment managers:
conda create -n tradingagents python=3.13
conda activate tradingagents
Install dependencies:
pip install -r requirements.txt
Required APIs
You will also need the FinnHub API for financial data. All of our code is implemented with the free tier.
export FINNHUB_API_KEY=$YOUR_FINNHUB_API_KEY
You will need the OpenAI API for all the agents.
export OPENAI_API_KEY=$YOUR_OPENAI_API_KEY
CLI Usage
You can also try out the CLI directly by running:
python -m cli.main
You will see a screen where you can select your desired tickers, date, LLMs, research depth, etc.
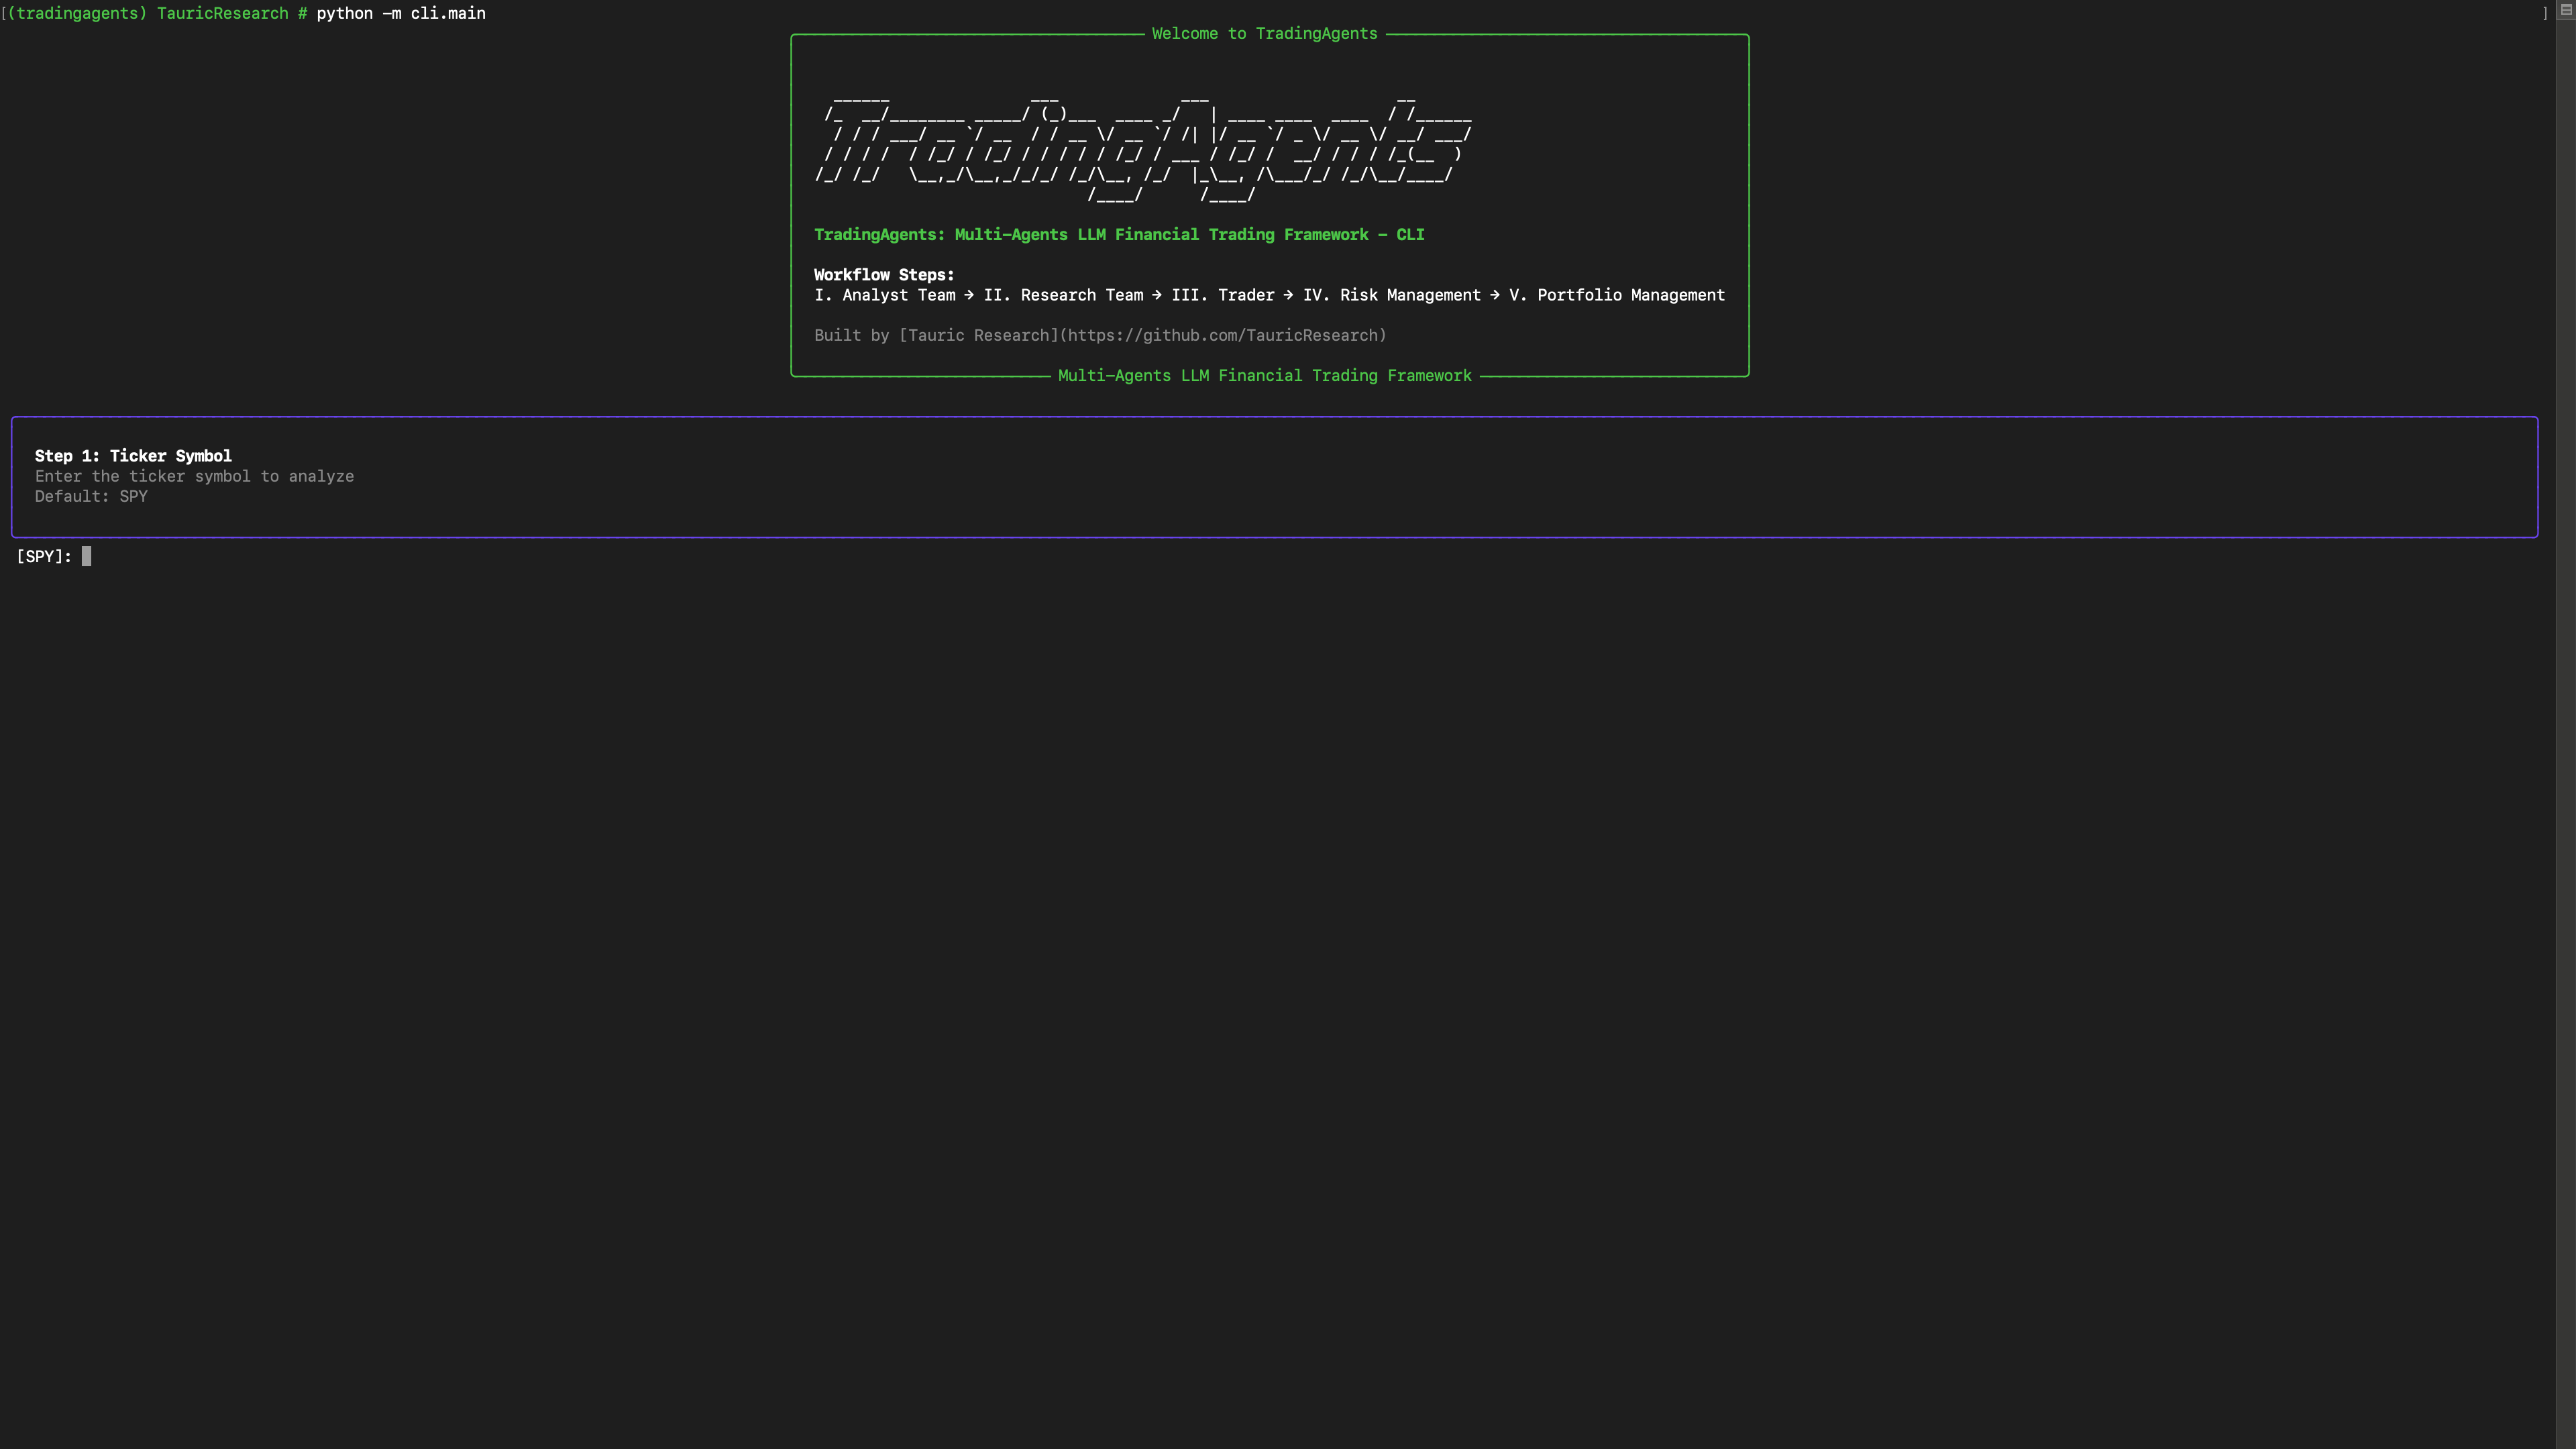
An interface will appear showing results as they load, letting you track the agent's progress as it runs.

![]()
TradingAgents Package
Implementation Details
We built TradingAgents with LangGraph to ensure flexibility and modularity. We utilize o1-preview and gpt-4o as our deep thinking and fast thinking LLMs for our experiments. However, for testing purposes, we recommend you use o4-mini and gpt-4.1-mini to save on costs as our framework makes lots of API calls.
Python Usage
To use TradingAgents inside your code, you can import the tradingagents module and initialize a TradingAgentsGraph() object. The .propagate() function will return a decision. You can run main.py, here's also a quick example:
from tradingagents.graph.trading_graph import TradingAgentsGraph
from tradingagents.default_config import DEFAULT_CONFIG

ta = TradingAgentsGraph(debug=True, config=DEFAULT_CONFIG.copy())

# forward propagate
_, decision = ta.propagate("NVDA", "2024-05-10")
print(decision)
You can also adjust the default configuration to set your own choice of LLMs, debate rounds, etc.
from tradingagents.graph.trading_graph import TradingAgentsGraph
from tradingagents.default_config import DEFAULT_CONFIG

# Create a custom config
config = DEFAULT_CONFIG.copy()
config["deep_think_llm"] = "gpt-4.1-nano"  # Use a different model
config["quick_think_llm"] = "gpt-4.1-nano"  # Use a different model
config["max_debate_rounds"] = 1  # Increase debate rounds
config["online_tools"] = True # Use online tools or cached data

# Initialize with custom config
ta = TradingAgentsGraph(debug=True, config=config)

# forward propagate
_, decision = ta.propagate("NVDA", "2024-05-10")
print(decision)
For
online_tools, we recommend enabling them for experimentation, as they provide access to real-time data. The agents' offline tools rely on cached data from our Tauric TradingDB, a curated dataset we use for backtesting. We're currently in the process of refining this dataset, and we plan to release it soon alongside our upcoming projects. Stay tuned!
You can view the full list of configurations in tradingagents/default_config.py.
Contributing
We welcome contributions from the community! Whether it's fixing a bug, improving documentation, or suggesting a new feature, your input helps make this project better. If you are interested in this line of research, please consider joining our open-source financial AI research community Tauric Research.
Citation
Please reference our work if you find TradingAgents provides you with some help :)
@misc{xiao2025tradingagentsmultiagentsllmfinancial,
      title={TradingAgents: Multi-Agents LLM Financial Trading Framework},
      author={Yijia Xiao and Edward Sun and Di Luo and Wei Wang},
      year={2025},
      eprint={2412.20138},
      archivePrefix={arXiv},
      primaryClass={q-fin.TR},
      url={https://arxiv.org/abs/2412.20138},
}
TradingAgents Web Application
CLI 기능을 웹에서 사용할 수 있는 React + Django 웹 애플리케이션입니다.
주요 기능
-
사용자 인증
- JWT 기반 로그인/회원가입
- OpenAI API 키 관리 (암호화 저장)
- 개발자 기본 키 fallback
-
거래 분석
- CLI의 모든 분석 기능을 웹에서 사용
- 실시간 분석 진행 상황 (WebSocket)
- 분석 기록 관리
-
사용자 경험
- 현대적인 React UI (Ant Design)
- 반응형 디자인
- 실시간 업데이트
기술 스택
백엔드
- Django 4.2 - 웹 프레임워크
- Django REST Framework - API 개발
- Django Channels - WebSocket 지원
- MySQL 8.0 - 데이터베이스 (Docker)
- Redis 7 - WebSocket 메시지 브로커 (Docker)
- JWT - 인증
프론트엔드
- React 18 - UI 라이브러리
- Ant Design - UI 컴포넌트
- Styled Components - 스타일링
- Axios - HTTP 클라이언트
- WebSocket - 실시간 통신
설치 및 실행
1. 환경 설정
# 가상환경 생성 및 활성화
python -m venv venv
source venv/bin/activate  # Windows: venv\Scripts\activate

# Python 의존성 설치
pip install -r requirements.txt

# Node.js 의존성 설치
cd web/frontend
npm install
cd ../..
2. 데이터베이스 및 Redis 설정 (Docker)
Docker와 Docker Compose를 이용해 MySQL과 Redis를 실행합니다.
# Docker 및 Docker Compose 설치 확인
docker --version
docker-compose --version

# 편의 스크립트 사용 (권장)
chmod +x scripts/docker-commands.sh
./scripts/docker-commands.sh start

# 또는 직접 Docker Compose 명령 사용
docker-compose up -d mysql redis

# phpMyAdmin도 함께 시작 (데이터베이스 관리용)
./scripts/docker-commands.sh start-all

# 컨테이너 상태 확인
./scripts/docker-commands.sh status
3. 환경 변수 설정
web/backend/.env 파일을 생성합니다. env_example.txt를 참고하여 설정하세요:
# 예시 파일을 복사하여 시작
cp web/backend/env_example.txt web/backend/.env

# .env 파일을 편집하여 실제 값들로 변경
nano web/backend/.env  # 또는 다른 텍스트 에디터 사용
주요 설정값들:
# Django 설정
SECRET_KEY=your-secret-key-here-change-this-to-a-random-string
DEBUG=True
ALLOWED_HOSTS=localhost,127.0.0.1

# MySQL 데이터베이스 설정 (Docker)
DB_NAME=tradingagents_web
DB_USER=root
DB_PASSWORD=your-mysql-password-here
DB_HOST=127.0.0.1
DB_PORT=3306

# Redis 설정 (Docker)
REDIS_HOST=127.0.0.1
REDIS_PORT=6379

# OpenAI API 키 (개발자 기본 키)
OPENAI_API_KEY=your-openai-api-key-here
4. 데이터베이스 마이그레이션
cd web/backend
python manage.py makemigrations
python manage.py migrate
python manage.py createsuperuser  # 관리자 계정 생성
5. 개발 서버 실행
터미널 1 - Docker 컨테이너 (MySQL + Redis):
# 백그라운드에서 실행
docker-compose up -d mysql redis

# 또는 포그라운드에서 로그 확인
docker-compose up mysql redis
터미널 2 - Django 백엔드:
cd web/backend
python manage.py runserver
터미널 3 - React 프론트엔드:
cd web/frontend
npm start
접속 정보
- 프론트엔드: http://localhost:3000
- 백엔드 API: http://localhost:8000
- Django Admin: http://localhost:8000/admin
- phpMyAdmin (선택사항): http://localhost:8080
API 엔드포인트
인증
POST /api/auth/register/- 회원가입POST /api/auth/login/- 로그인GET /api/auth/user/- 사용자 정보PUT /api/auth/profile/- 프로필 수정POST /api/auth/check-api-key/- API 키 검증
거래 분석
GET /api/trading/config/- 분석 설정 정보POST /api/trading/start/- 분석 시작GET /api/trading/status/{id}/- 분석 상태 조회GET /api/trading/history/- 분석 기록GET /api/trading/report/{id}/- 분석 보고서
WebSocket
ws://localhost:8000/ws/trading-analysis/- 실시간 분석 업데이트
OpenAI API 키 관리
- 사용자 개별 키: 사용자가 프로필에서 설정한 개인 OpenAI API 키
- 개발자 기본 키:
.env파일의OPENAI_API_KEY(사용자 키가 없을 때 사용) - 보안: 사용자 키는 암호화되어 데이터베이스에 저장
프로젝트 구조
├── cli/                    # 기존 CLI 코드
├── web/
│   ├── backend/           # Django 백엔드
│   │   ├── tradingagents_web/    # 프로젝트 설정
│   │   └── apps/                 # Django 앱들
│   │       ├── authentication/   # 사용자 인증
│   │       ├── trading_api/      # 거래 분석 API
│   │       └── websocket/        # WebSocket 처리
│   └── frontend/          # React 프론트엔드
│       ├── public/
│       └── src/
│           ├── components/       # 재사용 컴포넌트
│           ├── contexts/         # React Context
│           ├── pages/           # 페이지 컴포넌트
│           ├── services/        # API 서비스
│           └── styles/          # 스타일 관련
└── requirements.txt       # Python 의존성
개발 가이드
새로운 분석 기능 추가
apps/trading_api/services.py에 새로운 서비스 추가apps/trading_api/views.py에 새로운 뷰 추가apps/trading_api/urls.py에 URL 패턴 추가- 프론트엔드에서 해당 API 호출
새로운 페이지 추가
src/pages/디렉토리에 새 페이지 컴포넌트 생성src/App.js에 라우트 추가- 필요한 경우 레이아웃의 메뉴에 추가
배포
Docker Compose (권장)
# 모든 서비스를 한 번에 시작 (개발 환경)
docker-compose up -d

# 특정 서비스만 시작
docker-compose up -d mysql redis

# 프로덕션 환경에서는 별도의 docker-compose.prod.yml 사용 권장
docker-compose -f docker-compose.prod.yml up -d
수동 배포
-
프론트엔드 빌드:
cd web/frontend npm run build -
Django 정적 파일 수집:
cd web/backend python manage.py collectstatic -
프로덕션 서버 설정 (Nginx + Gunicorn + Daphne)
문제 해결
일반적인 문제
-
Docker 컨테이너 관련
# 컨테이너 상태 확인 docker-compose ps # 컨테이너 로그 확인 docker-compose logs mysql docker-compose logs redis # 컨테이너 재시작 docker-compose restart mysql redis -
WebSocket 연결 실패
- Redis 컨테이너가 실행 중인지 확인:
docker-compose ps - 방화벽 설정 확인
- Redis 컨테이너가 실행 중인지 확인:
-
API 키 관련 오류
.env파일의OPENAI_API_KEY확인- 사용자 프로필에서 API 키 재설정
-
데이터베이스 연결 오류
- MySQL 컨테이너 상태 확인:
docker-compose logs mysql .env파일의 데이터베이스 연결 정보 확인- 컨테이너 포트 충돌 확인:
docker port tradingagents_mysql
- MySQL 컨테이너 상태 확인:
-
MySQL 컨테이너 초기화 문제
# 볼륨 삭제 후 재시작 (데이터 손실 주의!)
docker-compose down -v
docker-compose up -d mysql redis
라이선스
이 프로젝트는 기존 TradingAgents 프로젝트의 라이선스를 따릅니다.
기여
- Fork the Project
- Create your Feature Branch (
git checkout -b feature/AmazingFeature) - Commit your Changes (
git commit -m 'Add some AmazingFeature') - Push to the Branch (
git push origin feature/AmazingFeature) - Open a Pull Request